5 Cinematography
What Is Cinematography?
Simply put, cinematography refers to those aspects of a film that deal with the camera, including composition, movement, shot duration, angles, perspective, light, and color.
Probably the second most important person on the set behind the director is cinematographer or “DP,” the director of photography.[1] This person helps the Director create the visual look that he or she wants for the film. This person must have strong skills as both an artist and a technical expert. Remember to differentiate this person from the camera operator, whose job it is to actually shoot the footage. One person could do both jobs on a smaller production, but larger productions today typically have many camera operators, but only one DP. Lighting is a key component of cinematography. For artistic reasons, it is also an important quality of mise-en-scène, but lighting is a critical component of cinematography because of how it is used to create contrast and exposure.
Cinematography depends on three primary elements:
1. The composition of the objects and people within the frame
2. The photographic quality of the image
3. The movement of the camera[2]
The role of cinematography in storytelling is two-fold: first, cinematography describes a space that is convincingly “realistic” within the film’s universe and secondly cinematography describes a particular point of view, a perspective, through which we are told about this world.[3] Each story has variables that might impact these two cinematographic roles. For example, a fantasy story set in an imaginary universe might not care about creating “realism” per se, but the DP will use cinematography to help establish a convincing place that feels emotionally real, if not accurate or “real” by the standards of our world. Or, for example, a story might not be from any particular point of view – it might not have a narrator or a sympathetic main hero to follow. Just the same, the cinematography will still use immersive techniques to make us follow and invest in the camera as it portrays an omniscient view of the story.
The following video from In Depth Cine offers a succinct overview of cinematography:
In the following sections, we will examine some of the elements of cinematography in more detail.
Camera Placement (Angles)
Though we might not always realize it, where the camera is placed with relation to the scene gives us a great amount of visual and narrative information. We generally like to look into our characters’ faces, at eye-level, so any deviation from this standard position reads as meaningful. A low-height camera creates a low angle shot that might cut off faces entirely, focusing on knees or feet if characters are standing. In other films, such as Yasujirō Ozu’s Tokyo Story (1953), a low camera height is needed to showcase characters sitting on Japanese tatami mats. In this case, the camera is adjusted so that we can still stare into characters’ faces as they sit at ground-level. The camera brings us down to a domestic ground and, in turn, we feel as though we are sitting with the characters in an intimate, familial way.
Tokyo Story
A high-height camera films well above characters’ faces, perhaps staring out at the horizon like a bird, perched on a tree. Looking down from this vantage point onto a character, the camera would take on a high angle, distorting the character’s body. From a high angle, we would see the character’s head loom large and their body would look very small and very vulnerable, as in Avengers (2012). It is no surprise that high-angle shots generally evoke a sense of power or knowledge over the characters who are in frame. This is the point of view of a mobster, looking down on a victim. The high angle can also represent a more abstract metaphor of judgment, as in Alfred Hitchcock’s and Martin Scorsese’s films, which use high-angle shots in moments of ethical dilemma.
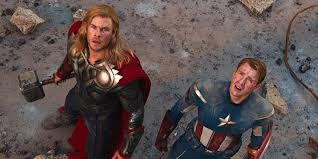
Avengers (high angle)
Alternatively, a shot that represents a victim’s point of view, looking at a threatening man with a knife, as in Inglourious Basterds (2009), would likely use a low angle. In this way, the camera makes the audience feel a sense of vulnerability and powerlessness by making us feel small while the character on screen looms large above us. Additionally, low-angle cameras tend to distort characters’ faces, making them look unflattering–this further places us in the victim’s point of view by distancing us from a distorted, monstrous face. In moments of psychological turmoil or extreme power imbalance, the camera might tilt on its axis to create a canted angle (also called a Dutch angle.) This technique has been used since silent cinema to evoke a sense of unease in the audience. In the 1950s, the Dutch angle was used excessively in Rebel Without a Cause (1955) to show power shifts between teenagers and figures of authority (parents, police officers). In Fear and Loathing in Las Vegas (1998), Terry Gilliam cants his camera when characters become drug-induced – the camera visually represents the feeling of being off-kilter.

Inglourious Basterds (low angle)
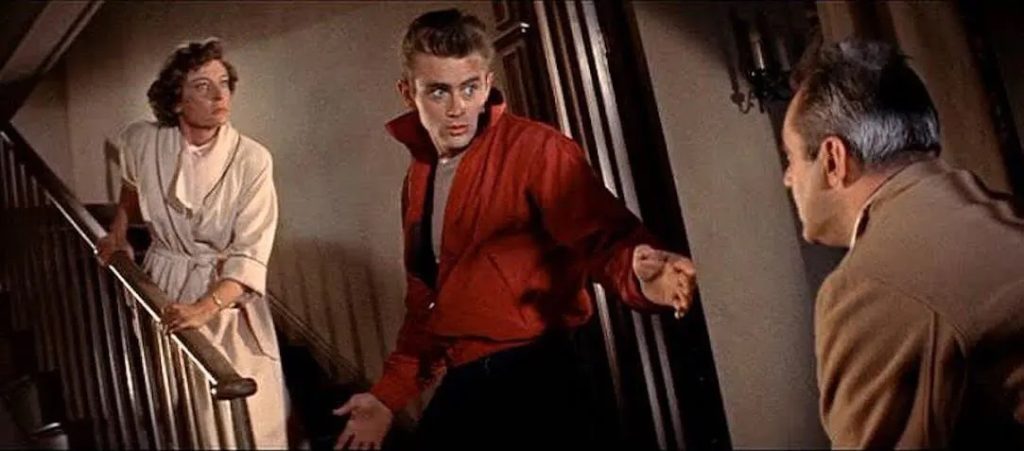
Rebel without a Cause (canted angle)
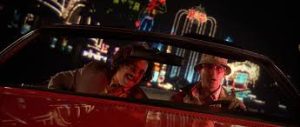
Fear and Loathing in Las Vegas (canted angle)
Camera Placement (Shot Scale/Distance)
In addition to determining the camera’s angle, the DP, in consultation with the director, must decide how close the subject will appear in the shot. The camera distance will not only determine the type of visual information within the shot but will also impact the audience’s emotional connection with the subject. Cognitive scientists Brendan Rooney and Katalin E. Bálint, for example, explain that films with a higher number of close shots tend to evoke increased levels of viewer empathy toward the characters, as such shots help focus spectator “attention to the mental states of characters” (9). More distant shots, however, can help viewers orient themselves to changes of location or overall mood, while medium shots can reveal–or conceal–a host of other factors pertaining to narrative, characterization, or atmosphere.[4]
“As a recorder and creator of movement, the movie camera has been inevitably an instrument capable of displacing as placing, as much alienation as familiarizing.” –Parker (23)
In his Introduction to Film, Nick Lacey nicely summarizes some common shot types:
“extreme close-up—for example, part of a face
Hiroshima mon amour (1959)
close-up—face
The Battleship Potemkin (1925)
medium close-up—head and shoulders
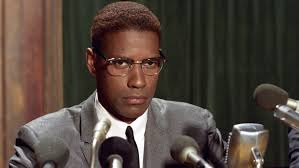
Malcolm X (1992)
medium shot—most of a body
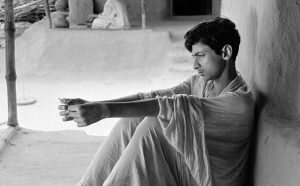
Aparajito (1956)
medium long shot—the whole body
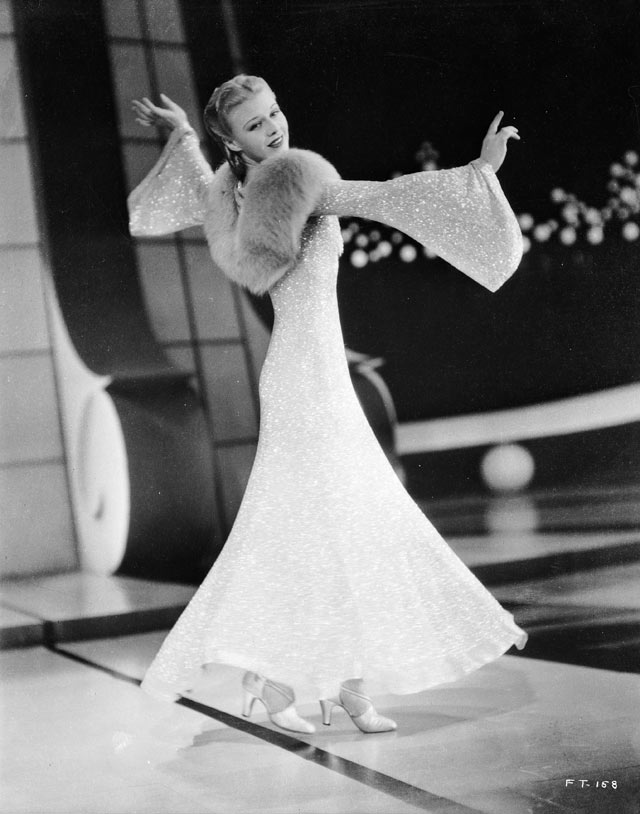
Top Hat (1935)
long-shot—two or three people’s whole bodies

American Fiction (2023)
extreme long shot—landscape” [often used for establishing shots] (Lacey 21).
The Searchers (1956)
Camera Movement
Though movement in the frame is most obviously carried by the actors who shift across the set, the camera contributes greatly to the sense of dynamism in a shot.[5] In fact, a shot might feature static characters and still be considered dynamic through the motion that the camera contributes to the scene.
Two very simple movements can be achieved with a static camera on a tripod or on a standing cameraman: a tilt and a pan. By swiveling the camera from side to side, a pan represents the turn of a human head. This appears to be a very natural movement to the viewer. Just as we turn our heads side to side in order to read a room, the camera’s pan creates an eyeline view and reads the fictional space like a book. It is no wonder that in Western cinema, panning from left to right feels the most natural, just like reading a Western book, from left to right.
A tilt brings the camera-head up or down and represents a vertical scan. This feels less natural than a pan, since we generally spend less time looking up and looking down when we read our environments. The tilt nonetheless becomes a very important tool for specific cinema moments, like reading characters from head to toe or finding hidden figures in unusual spaces, like ceilings, in horror films.
A third, less used, camera tactic is a pedestal, where the camera remains level but is lifted up on its tripod to read an environment up and down without tilting. In Orson Welles’ Citizen Kane (1941), the mansion Xanadu is revealed to us with a pedestal. We first see a “No Trespassing” sign, then the camera pedestals up over gates until we finally have an answer to the question of what should not be trespassed: the mansion Xanadu sitting on a hill in the distance with the gate’s large “K” (for Kane) looming large in the foreground.
Citizen Kane
In order to get even more motion in a shot, we might place the camera stand onto a moving object. In early cinema history, we see cameras placed on trains, boats, planes, and cars to get the shot to move quickly in a stable way. Since the camera, for most of cinema history, was extremely heavy, it was difficult to create a steady image using just a camera operator’s body (a hand-held shot). Once cameras became more lightweight in the 1960s, extensive use of the hand-held shot became an option for cinema, and even then it was considered an experimental strategy used for European art films or for documentary footage.
Generally, a stable moving shot is created using a dolly. A track is laid out for the shot that choreographs the camera’s path with the actor’s, and a platform is set up on this track to move the camera and the cinematographer together as the scene is filmed. These dollies can be set up in a straight line or in a curve, on a paved street or in a wild landscape. The main restriction of a dolly shot is that its movement must conform to the ground.
The effect of a tracking shot is a smooth movement, often using a dolly, that tracks characters as they walk through their environment. When we watch a tracking shot, we are unaware of the dolly setup – it becomes invisible to the viewer because it is an unobtrusive movement. Its smoothness allows us to feel as though we are with the characters, walking side-by-side with them and investing in their problems, their concerns, and their emotions. The dolly shot brings us closer to characters, and its invisibility helps to enforce our identification with them.
Another type of dolly shot places the actor on a dolly too. The double dolly shot is associated most closely with filmmaker Spike Lee, who uses the technique in nearly every one of his films. The effect of the double dolly shot is an interior experience, an extreme closeness with the mental state of a character. When the camera’s dolly and the actor’s dolly are synchronized so that they are moving the exact same pace, a different one than the rest of the environment, we feel as though we have been let in to such a personal experience that no one else can understand but us. This effect brings us even closer to the character and helps us to identify even more deeply with them through a technique that feels dreamy and isolated.
Montage of Lee’s dolly shots
A more complicated and freer setup for a camera movement is a crane shot, in which the camera and cinematographer sit on a crane platform that can take them up into the air to shoot a scene from above. This is, of course, a more complicated setup because the camera movement must be coordinated with much heavier equipment and requires more safety measures. The effect of a crane shot is an omniscient, powerful gaze that can see the story world from above, from a viewpoint that the characters do not have access to. Films might use a crane for an establishing shot to orient the viewer in space before cutting in to the scene itself, or films might use the crane shot to create a long take that scans the set from many angles. Hollywood musicals of the 1930s by Busby Berkeley, like 42nd Street (1933), utilized crane shots to create detailed geometries with dancers’ bodies, filmed from above. The effect is kaleidoscopic as human bodies are turned into abstract shapes from high, flying angles that feel thrillingly inhuman.
42nd Street
Perhaps the most famous long-take crane shot was created by Orson Welles for the opening of his Touch of Evil (1958). In this scene, the camera sneaks along a wall and witnesses a bomb being placed into the trunk of a car. Then the camera lifts into the air as the car drives away into city streets. For over three minutes, the camera loses and catches up to the car, sometimes dipping down to street level, sometimes lifting up to see the street from the sky. Welles teases his audience; he lets the tense scenario be examined from many angles and he lets the car be lost and found again. When the car finally explodes, it does so with a sharp cut that feels like an explosion of editing, since the three-minute long take has made us so accustomed to the smooth, omniscient crane setting.
Touch of Evil
The latest technological innovation for a flying camera effect is the drone shot, which can now replace a helicopter- or plane-mounted camera shot. A drone shot, in which a drone-mounted camera films from the air, can be used for establishing shots, and the footage is often rendered in slow motion for a smoother effect. It is difficult, however, to use a drone-mounted camera to film close-ups and actor details. Crane shots are still the industry standard for omniscient long takes that include both establishing shots and medium shots or close-ups in the same footage.
Skyfall (2015)
The crane shot and drone shot are both freer forms of filming than the dolly in that they are able to move in all directions, unbounded by a track that must be laid out in advance of shooting. The dolly shot is restricted to the types of terrain that are track-friendly, and its camera is also unable to look at the ground for fear of filming its own track setup. Technology developed in 1975, the Steadicam, fixed many dolly track problems. Because the Steadicam is attached to the camera operator’s body with various stabilizers, it creates a smooth movement even when the operator jostles it with rough footsteps or uneven terrain. Like a dolly track, the Steadicam shot is smooth and immersive. But unlike a dolly track, the Steadicam shot can move into spaces unfriendly to a track and can shoot the ground, where a track would normally have been laid. Though the Steadicam technology was used sparsely in several late-1970s films, the most extensive use of the Steadicam is credited to The Shining (1980), in which characters are tracked low to the ground as they move through many hallway corners in single takes. Such complicated shots would be difficult to capture in a dolly shot. The Steadicam gaze, floating along so close to the ground, registers to the viewer as a creeping, ghostly presence, a look that fits this horror film’s themes perfectly.
The Shining
Of course, if a filmmaker desires a cheap or a rough look to camera movement, then a handheld shaky cam shot can be preferable to the more expensive and complicated options of a dolly, crane, or Steadicam. Handheld cameras have long been used for documentary film because they provide freedom of movement and can more easily capture unplanned events. Many of these documentary handheld cameras inadvertently create a shaky camera look, and this look has become an aesthetic in narrative cinema that seeks a less sleek style. For example, mockumentaries replicate the shaky cam aesthetic in order to feel more authentic, more like a true documentary that aims to capture unstaged events. More recently, “found footage” horror films like The Blair Witch Project (1999) and Paranormal Activity (2007) have adopted shaky cam shots in order to feel more realistic and thus more horrific. Some light touches of shaky cam shots can be found now in most blockbuster films to evoke authenticity. Car chase sequences in recent action films, like Mad Max: Fury Road (2015) and Quantum of Solace (2008), use small, almost imperceptible inserts of shaky cam footage, taken from a camera attached to the side of a vehicle, in order to give authentic texture to the chase. These shots tend to be made with lesser quality cameras than the film generally, and so the texture of the footage feels closer to a documentary than a blockbuster film. Though the audience is not explicitly meant to notice these small shots edited into the sequence, they do impart a feeling of reliability to what is otherwise a rather unbelievable action scenario.[6]
The Blair Witch Project
The Lens
Another powerful tool a cinematographer has to work with is, of course, the camera.[7] Of course, much goes into how that particular apparatus works and the nuances between different formats and manufacturers. We want to focus, however, on the one component that is interchangeable and allows for endless variety: the lens. No matter what camera a cinematographer chooses, it’s the lens that determines the clarity, framing, depth of field, and exposure of the image. Just by changing the lens, without moving the camera at all, you can radically transform the look of a shot.
The principle behind a camera lens is fairly simple. A piece of curved glass (or several pieces depending on the lens), held in place on the front of the camera, focuses light through an adjustable aperture (a fancy word for “hole”) and onto light-sensitive material (film or a digital sensor). The aperture controls the amount of light entering the camera, and the glass “elements” control the sharpness of the image by moving closer or further away in tiny increments from the aperture. The overall distance between the sensor and the point at which the light passes through those glass elements is called the focal length and is measured in millimeters. In a 50mm lens, for example, the distance between the sensor of the camera and the point where the light passes through the glass of the lens is 50 millimeters.
Focal length determines both the angle of view and the magnification of the image. The shorter the focal length, the wider the angle of view and the smaller the magnification. The longer the focal length, the narrower the angle of view and the greater the magnification. Any lens below 35mm is generally considered a “wide-angle lens” because of its relatively short focal length. Any lens above 70mm is considered a “telephoto lens” because it greatly magnifies the image.
Lenses can be divided into two basic types based on how they treat focal length: zoom and prime. Zoom lenses allow you to adjust the focal length by sliding the glass elements closer to or further away from the sensor, thus greatly magnifying the image or widening the angle of view without swapping out the lens itself. Prime lenses have a fixed focal length. What you see is what you get. Now we know what you’re thinking. Why not just slap a zoom lens on there and choose your own focal length? Actually, cinematographers almost always use prime lenses when filming. For one thing, zoom lenses tend to have many more glass elements than primes and that can affect the quality of the image. More important, though, prime lenses force the cinematographer to be more deliberate and intentional about the angle of view and magnification of a particular shot.
In the video below, cinematographer Tom Sigel explains some basic lens types.
Tom Sigel on camera lenses
Depth of Field
Angle of view and magnification are important in terms of what’s visible in the frame, but just as important is what appears to be in sharp focus. Lenses also allow cinematographers to control the depth of the image by either isolating a subject as the only element we see clearly in a particular shot or allowing us to see everything in the background and foreground equally. This is called depth of field, the range of distance in front of the camera in which subjects are in sharp focus. DPs and directors often use depth of field to draw viewer attention to a particular person or object within the frame.
Take a look at this image from Selma (2014):

Selma
Note how David Oyelowo, playing Martin Luther King, Jr., is isolated from the background, focusing our attention on his face and gesture This is an example of shallow (or narrow) depth of field. The range of distance in front of the camera in which subjects are in sharp focus is relatively small, creating less depth to the image.
Now check out this image from Make Way for Tomorrow (1937):
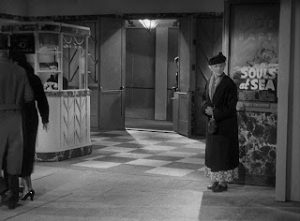
Make Way for Tomorrow
Note that everything seems to be equally in focus, allowing us to pick out all of the details of the set design. This is an example of a wide depth of field or deep focus.
Since cinematography is all about moving pictures, this is not necessarily a binary choice. A cinematographer can change the depth of field within a shot to shift our attention from one subject to another. This is called a rack focus or focus pull:
Fandor on focus pull
Now that you know what it is, you’ll see it all the time in film and television. In fact, there’s usually one person on set whose only job is to manage those shifts in the depth of field within a shot. They’re called, appropriately enough, a focus puller.
Aspect Ratio
Before cinematographers can start to think about how to properly compose a shot, they have one more decision to make: the shape of their frame. Okay, every frame (for now) is some variation on a rectangle. But the proportions of that rectangle will dictate how people, objects and setting are arranged within it. This is known as the aspect ratio, the width of the frame relative to its height. The current standard for motion pictures is 16:9, or 1.78:1, a rectangle that is almost twice as wide as it is tall. But in the early days of cinema, the standard was much closer to a square, 4:3, sometimes called the academy ratio. And sometimes filmmakers opt for a much wider frame, as wide as 2.35:1. That aspect ratio is a particular favorite of Quentin Tarantino. Whatever aspect ratio a filmmaker chooses will affect the choices they make regarding composition. Check out this quick comparison:
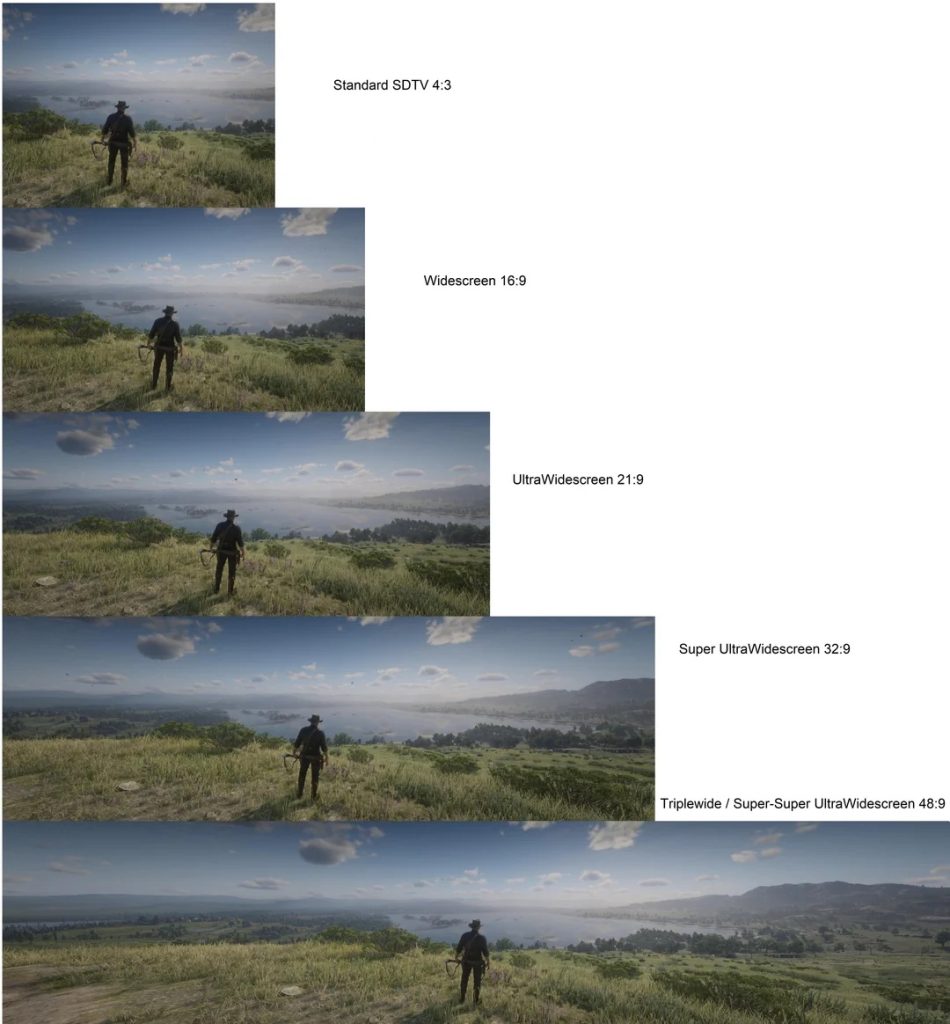
Ultrawide’s comparison of aspect ratios
Once a filmmaker has chosen their aspect ratio, the most basic starting point for composition, one we all intuitively understand from our own experience snapping photos with our phones, is balance. Images that are well-balanced use the space within the frame to distribute visual interest evenly, creating a proportional, pleasing composition. (Unless that’s not what you’re going for, but we’ll get to that). One way to achieve that balance is the rule of thirds. The idea is to divide the frame into thirds horizontally and vertically and line up areas of visual interest at the intersection of those points. Here’s an great explanation from Camber Film School:
The Rule of Thirds
By arranging actors and objects along the intersection of the grid lines, a composition feels well-balanced and proportional. The rule of thirds is all about balance and proportion in the composition, to bring a sense of symmetry to the image.
Light
Remember that we discussed lighting in chapter four, visual design. Lighting dramatically impacts visual design in that it affects everything that the viewer sees in the frame. DPs are extremely concerned with the use of light on both the technical and aesthetic levels. As should be obvious, cinema cannot exist without light. Light exposes the image and, of course, allows us to see it. But it’s the creative use of light, or lighting, is what makes it an element design.
A cinematographer can illuminate a given scene with practical light–that is, light from lamps and other fixtures that are part of the set design–, set lights, light fixtures that are off camera and specifically designed to light a film set, or even available light: light from the sun or whatever permanent fixtures are at a given location. In each case, cinematographers are not simply throwing a light switch, they are shaping that light, making it work for the scene and the story as a whole. They do this by emphasizing different aspects of lighting direction and intensity. A key light, as we have previously learned, is the main light that illuminates a subject. A fill light fills out the shadows a strong key light might create, and a back light helps separate the subject from the background. It’s the consistent use of a particular lighting design that makes it a powerful part of both cinematography and mise-en-scène.[8]
Two basic approaches to lighting style can illustrate the point. Low-key light leaves shadows.[9] This is the type of mood that would be appropriate for crime, horror, or film noir movies. The higher the key and fill lighting are, the brighter and happier the mood of the movie or scene is. High key and fill lighting is appropriate for comedies and musicals.[10] In either case, the cinematographer, working closely with the director and production designer, is using light as an element of design, contributing to the overall mise-en-scène.[11]
Low-key lighting refers to a lighting design where the key light remains subtle and even subordinate to other lighting sources. The result? A high-contrast lighting design that make consistent use of harsh shadows. Another word for this is chiaroscuro lighting (this time we’re stealing a fancy word from Italian). Think of old detective movies with the private eye stalking around the dark streets of San Francisco.
The Big Combo (1955) uses classic low-key lighting design:
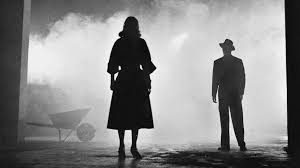
The Big Combo
High-key lighting refers a lighting design where the key light remains the dominant source, resulting in a low-contrast, even flat or washed-out look to the image. Think about Hollywood musicals and comedies that try to avoid “interesting” shadows that might distract us from the big production number or the joke. Here’s a still from Mama Mia! (2008) that exemplifies high-key lighting:[12]
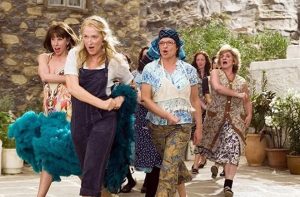
Mama Mia!
Point of View
The exact same action, when filmed in different ways, can create a multitude of emotional and intellectual responses within the viewer. For instance, a subjective point of view allows viewers to “relate” to the actor, whereas the identical action filmed from an objective point of view might not resonate as strongly and allow the viewer to “detach” somewhat. Typically, a film will vary its point of view or perspective, often within the same scene. The classic shot-reaction shot, for example, can show viewers the same interaction from two characters’ perspectives. At times, though, a director might select a dominant point of view for a film. Patrick Keating succinctly explains how cinematographers have historically toggled back and forth between points of view:
Whereas some filmmakers used the camera to offer an objective view of each scene, others pondered the ways that a camera might mimic a character’s subjective states. These conceptual tensions—imitation and liberation, revelation and concealment—shaped the history of camera movement by changing the ways that filmmakers imagined their art. (3)
Broadly, we may identify three general points of view and one POV category that captures unique choices a filmmaker may incorporate. See all four below:
1. Objective
The most common point of view, the objective perspective is untethered from a character’s frame of reference. The camera may offer a “bird’s eye view” of the action, a “fly on the wall” vantage point, or other view that allows the viewer to experience the action from a distance. As with all points of view, the camera may be static or in motion. An (ostensibly) impartial observer, the camera records the events without over-identifying with a character.
Here’s an example from Eve’s Bayou (1997) in which we first witness Eve reading a letter and then see the content of that letter appear. Notice that, save for a subjective shot near the end of the clip, our perspective is that of an objective “fly on the wall”:
Eve’s Bayou
2. Indirect Subjective
Offering a middle ground between objective and subjective point of view, the indirect subjective perspective moves closer to our characters, causing us to identify with their experiences more directly. This point of view might employ close-ups (including extreme close-ups), over-the-shoulder shots, or other approaches that, while not viewing the action through the character’s eyes nonetheless depict the scene in a more visceral, emotionally charged way.
In the following clip from Breathless (1960), the viewer gets a perspective that is very close to–but not identical to–that of the characters in the frame. The camera gives the feeling of looking over the shoulder of the characters as they drive through the city.
Breathless
3. Subjective
The least common perspective, the subjective point of view uses the camera as a proxy for a character’s own eyes. With this perspective, the character’s body is often absent altogether or viewed only in discrete body parts (looking down at the character’s shoes or hand, for example. The bond between viewer and character is sharpened and often emotionally charged. While some films, such as Lady in the Lake (1947) and Nickel Boys (2024) experiment with substituting the camera lens for the main character’s eyes for the full length of the picture, most use the approach more sparingly, as in Chinatown (1974), where select scenes are shot as though directly witnessing what the character sees.
In the following scene, the DP switches from the indirect subjective perspective to the subjective perspective captured as Jake Gittes peers through binoculars at Hollis Mulwray. The viewer witnesses exactly what Jake sees, and the film thus generates a sense of complicity between audience and character.
Chinatown
Lady in the Lake
Nickel Boys trailer
4. Director’s Interpretive
The director’s interpretive perspective is slightly more difficult to define, as it could encompass many choices. With this POV, the viewer is consciously aware that the filmmaker is calling our attention to the action in some unique way. They may be using extreme angles, a change in focus, slow or fast motion, etc., but no matter what their choice, the intent is to cause viewers to notice the manipulation. The camera becomes an active part of the storytelling.
In the following clip, there are a series of interactions spliced together (they actually occur at three separate times throughout the film) between Lola, the protagonist who is running to try to save her boyfriend, and an unnamed minor character on a bike. The timing when she encounters the man in the red shirt changes minutely, as we see different versions of their interaction. Note how the filmmaker then uses flash cuts of the biker’s future to show us how his life plays out after his different encounters with Lola. The jarring inserts definitely draw in the viewer and also work to enhance to the overall theme of this film, which questions the idea of fate, timing, and chance.
Run Lola Run
A note about sources
- https://oer.galileo.usg.edu/arts-ancillary/3/ ↵
- https://oer.galileo.usg.edu/arts-ancillary/3/ ↵
- https://alg.manifoldapp.org/read/film-appreciation/section/1b563fe7-a504-4b7b-84aa-31c899049c9e ↵
- https://alg.manifoldapp.org/read/film-appreciation/section/1b563fe7-a504-4b7b-84aa-31c899049c9e ↵
- https://alg.manifoldapp.org/read/film-appreciation/section/1b563fe7-a504-4b7b-84aa-31c899049c9e ↵
- https://alg.manifoldapp.org/read/film-appreciation/section/1b563fe7-a504-4b7b-84aa-31c899049c9e ↵
- https://uark.pressbooks.pub/movingpictures/chapter/cinematography/ ↵
- https://uark.pressbooks.pub/movingpictures/chapter/cinematography/ ↵
- https://milnepublishing.geneseo.edu/exploring-movie-construction-and-production/chapter/6-what-is-cinematography/ ↵
- https://milnepublishing.geneseo.edu/exploring-movie-construction-and-production/chapter/6-what-is-cinematography/ ↵
- https://uark.pressbooks.pub/movingpictures/chapter/mise-en-scene/#chapter-139-section-3 ↵
- https://uark.pressbooks.pub/movingpictures/chapter/mise-en-scene/#chapter-139-section-3 ↵